How To Set Up Print-Ready Files in Photoshop
You lovely people are here because you want me to tell you that designing for print in Adobe Photoshop is a cinch; that it might be a little tough but you'll be happy relying on this program for all your print design needs. Well, dear friend, I’m going to come right out and drop my first piece of Photoshop advice on you: maybe just don’t. You certainly can create print design in Photoshop, and I’m gonna tell you how, but just expect a frustrating process.
But I’m not here to tell you not to do something. I’m here to tell you how to use a complex tool as best you can, even if it might not be the best one for the job. With that preamble aside, onward to victory.
The Overview
The reason Photoshop isn’t great for print design is that it’s a raster-based program, and text is vector-based data. Since text is the thing that makes design design—that is, the practice of doing nice arty things for a real, measurable purpose—that’s kind of important. So Photoshop has to take these clean-edged mathematical curves that make up the simple letters you typed and convert them into jagged, aliased, ugly little pixels.
Plus, it turns out that a lot of what we’ve been taught about how pixels and resolution interact with a printer is just wrong, so that doesn’t help. If you print a document at what we’ve all been told is high-resolution 300ppi, it’s gonna look pixelated (what we in the biz refer to as “bad”).
Okay, well, fix it then.
Right, right. Well first, I should say that if you’ve already created a design at 300ppi or less, using anything other than plain, unadorned, still-editable text, you can’t just scale it up. I know, bummer, and hopefully this post will let you avoid that in the future, but you have to start over.
The New Document Window
There are 3 main attributes you should set up correctly when preparing a document for print in Photoshop:
Document trim size plus bleed
Very high resolution
Color mode: CMYK
If you wanna just skip this word malarky and get on with a project, you can copy the settings in this screenshot exactly to create an 8.5" x 11" document, but I encourage you to read on.
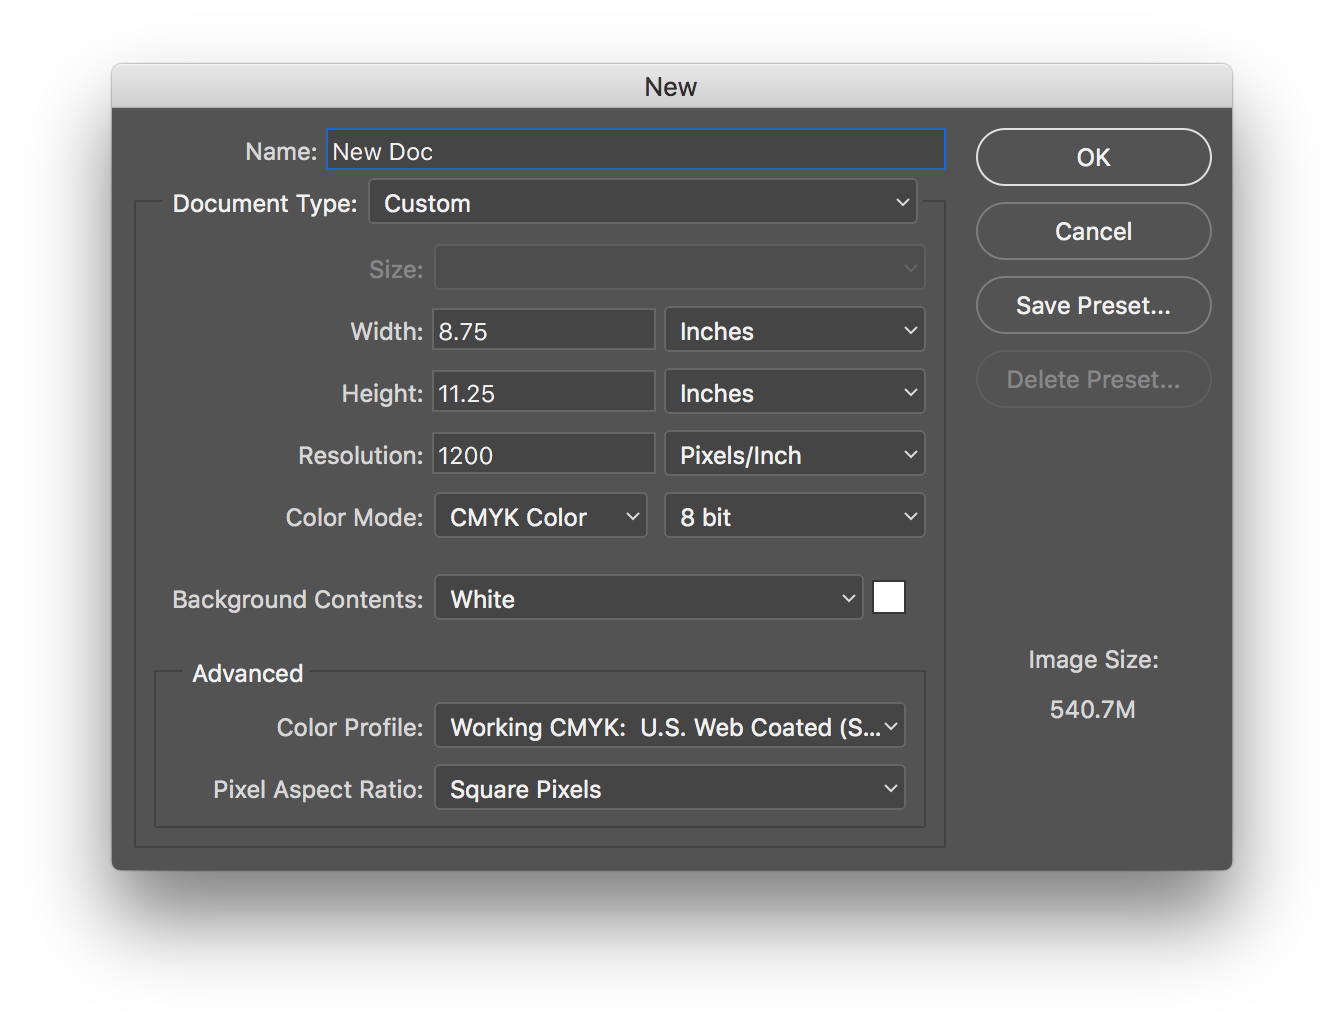
Document Size
Start by setting your units. In the US, I recommend inches, and everywhere else I recommend millimeters.
Set your Width and Height to your desired page size plus bleed. (See sidebar for super cool bleed info.)
Resolution
Standard “high-resolution” 300ppi is great for a photo or a painting, but for text-based design, it’s too small. As resolution increases, the number of pixels Photoshop uses to create one letter increases. That means more detailed, accurate, and legible text. Your document should be at least 600ppi. If you’re using a professional printer, you should go up to 1200ppi. Click on the graphic below to zoom in and see the difference proper resolution makes.
This is the same word at 4 different resolutions: 72, 300, 600, and 1200ppi. The difference is very noticeable when you zoom in to full size.
The downside is that when you increase the resolution, you’ll notice the file size increases dramatically. Yeah. This is why I said this is a bummer for everyone. You’re taking up a bunch of space on your computer with this massive file that takes 11 years to save and 11 years to attach to an email. I have no solution for 22 wasted years of life, except, maybe, consider trying something other than Photoshop.
Color Mode
Just set it to CMYK. That part’s easy. CMYK stands for Cyan, Magenta, Yellow, and Key (black), the 4 standard inks a printer combines to create different colors.
Bleed
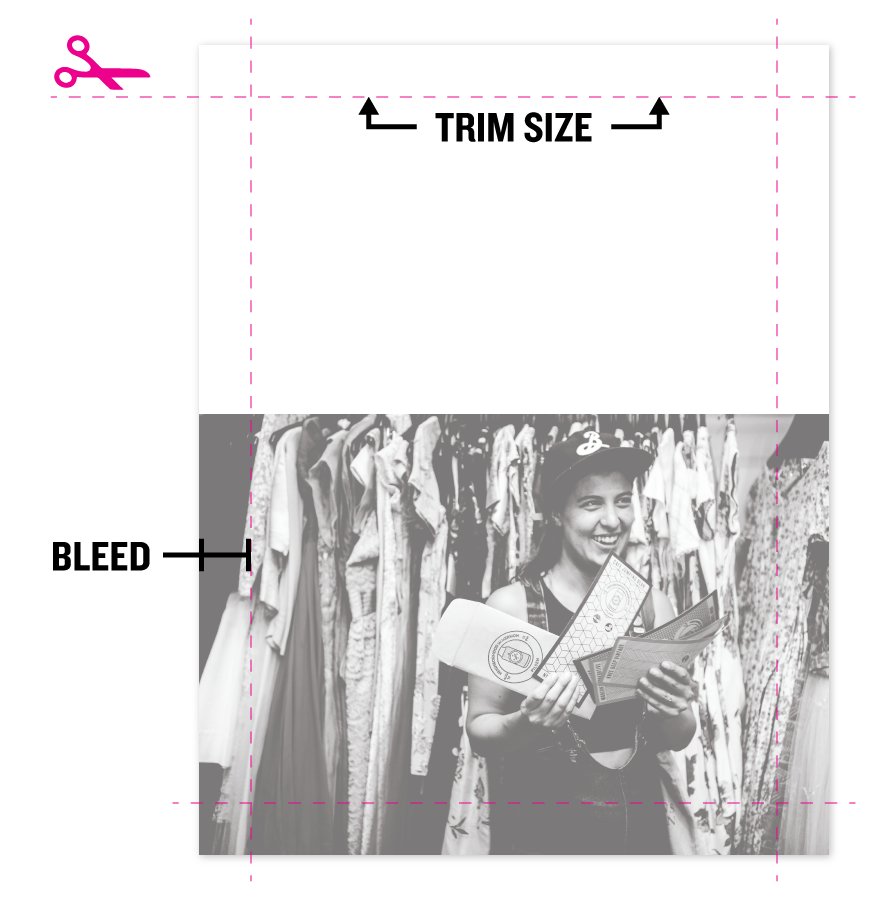
Have you noticed that whenever you try to print a nice photo across an entire sheet of paper, there are always white borders around the edges? That’s because a majority of printers aren’t built to print right to the edge. When you see professionally-printed designs with art going edge to edge (we call that “full bleed”), that’s because the printer printed with those same white borders and then trimmed into the art a little bit. They don’t trim at the edge, where the art stops and the blank white border begins, but actually cut into the art a bit to avoid any hint of that white border. “Bleed” is the little sliver of art that you build into a design with the intention of it getting trimmed off.
The print industry’s standard bleed is typically 1/8th” (0.125”)/3mm on each side of your document. So, for an 8.5” x 11” document being set up in Photoshop, your size should be set to 8.75” x 11.25”.
Designing
Now that your document is set up properly, there’s just one more step to make sure you’re creating a usable design: using Guides to define your work space. Guides are non-printing lines that you can use to represent the trim edge of your page and the margin within which all your important content should stay. For this example, we’re creating an 8.5” x 11” document.
First, if you don’t already see rulers along the top and bottom of your window, go to View > Rulers. To create Guides, just click and drag from one of the rulers onto your document.
So where do you place these Guides?

Trim Edge Guides
We’ve already established that standard bleed is 1/8th”, and your document size includes bleed. So, the trim edge is 1/8th” in from the top, bottom, left, and right. Click and drag from your top ruler and place a Guide 1/8th” down from the top of the page. Now click and drag from the top ruler, and place a Guide 1/8th” above the bottom edge of the page. Now do the same using the left ruler to the left and right of the page. When designing, any content that should bleed off the edge should be flush with the edge of the page, overlapping your bleed guides.
Margin Guides
As with bleed, safety margins have an industry standard. Content that gets too close to the edge risks getting cut off, so you should keep at least 1/8th”/3mm safety margin within the trim edge of the page. However, designs tend to look best when you leave a significantly larger margin. I recommend about 1” in on each side for an 8.5” x 11” page. Your document size includes bleed, so your Guides for this step should be 1.125” (that is, 1 and 1/8th”) in from each edge. The graphic to the right shows a document with proper trim edge Guides and 1" margin Guides.
If you’ve made it this far, you are an amazing human and you deserve all the successes Photoshop can possibly bring. It’s a slog through seemingly-trivial rules, but you’ll end up with designs that print beautifully every time. Check out my other posts if you want to try designing for print in Illustrator or InDesign. Got questions? Additional Photoshop tips you’ve found useful? Leave ‘em in the comments!